
There’s honestly not much to explain about this wargame. OverTheWire is simply awesome! I really enjoyed the challenges, and it’s such a great resource for anyone who’s learning.
I’ll just leave a quick recap of what I have learned from playing through this. 🙌
Level 0
Level Goal
The goal of this level is for you to log into the game using SSH. The host to which you need to connect is bandit.labs.overthewire.org, on port 2220. The username is bandit0 and the password is bandit0. Once logged in, go to the Level 1 page to find out how to beat Level 1.
The first level is super easy. We need to SSH into Bandit with username bandit0 and password bandit0 on port 2220.

We successfully login into Bandit:

You’ll see a welcome message with some notes:

bandit0
Level 0 → Level 1
Level Goal
The password for the next level is stored in a file called readme located in the home directory. Use this password to log into bandit1 using SSH. Whenever you find a password for a level, use SSH (on port 2220) to log into that level and continue the game.
The password for the next level is stored in readme file in the home directory. We just need to use cat to read its content.

ZjLjTmM6FvvyRnrb2rfNWOZOTa6ip5If
Level 1 → Level 2
Level Goal
The password for the next level is stored in a file called - located in the home directory
File named - stores the password. Since this is a special filename, we must use ./ to read it.

263JGJPfgU6LtdEvgfWU1XP5yac29mFx
Level 2 → Level 3
Level Goal
The password for the next level is stored in a file called spaces in this filename located in the home directory
Since the file name we need to read has spaces, we must place it inside quotes.

MNk8KNH3Usiio41PRUEoDFPqfxLPlSmx
Level 3 → Level 4
Level Goal
The password for the next level is stored in a hidden file in the inhere directory.
To get into inhere directory, we use cd. When we get there, the password is stored in a hidden file, so we must use ls -la to see it. Now our job is to read the password.
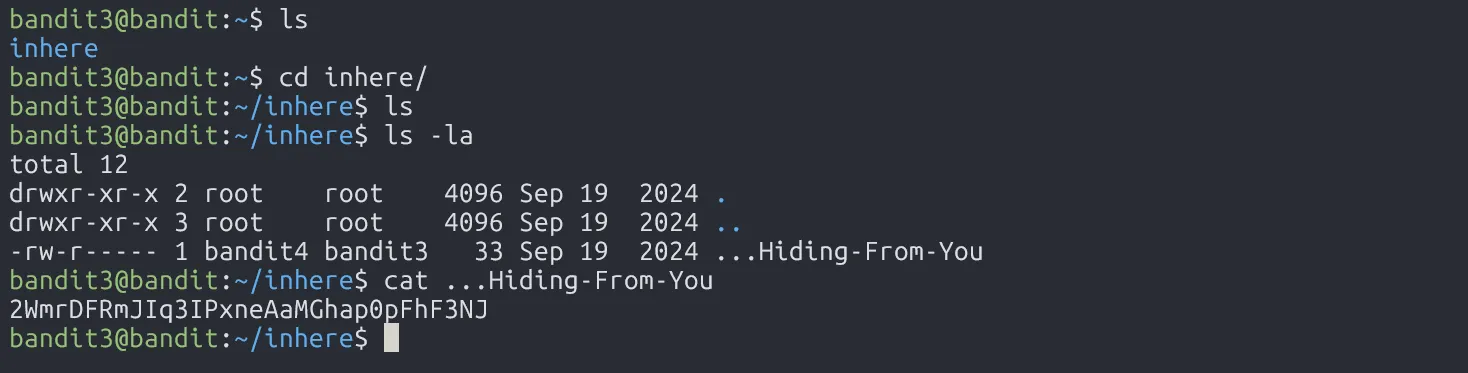
2WmrDFRmJIq3IPxneAaMGhap0pFhF3NJ
Level 4 → Level 5
Level Goal
The password for the next level is stored in the only human-readable file in the inhere directory. Tip: if your terminal is messed up, try the “reset” command.
The password is in a human-readable file in the inhere directory. To get the property of the file, we use the command file.
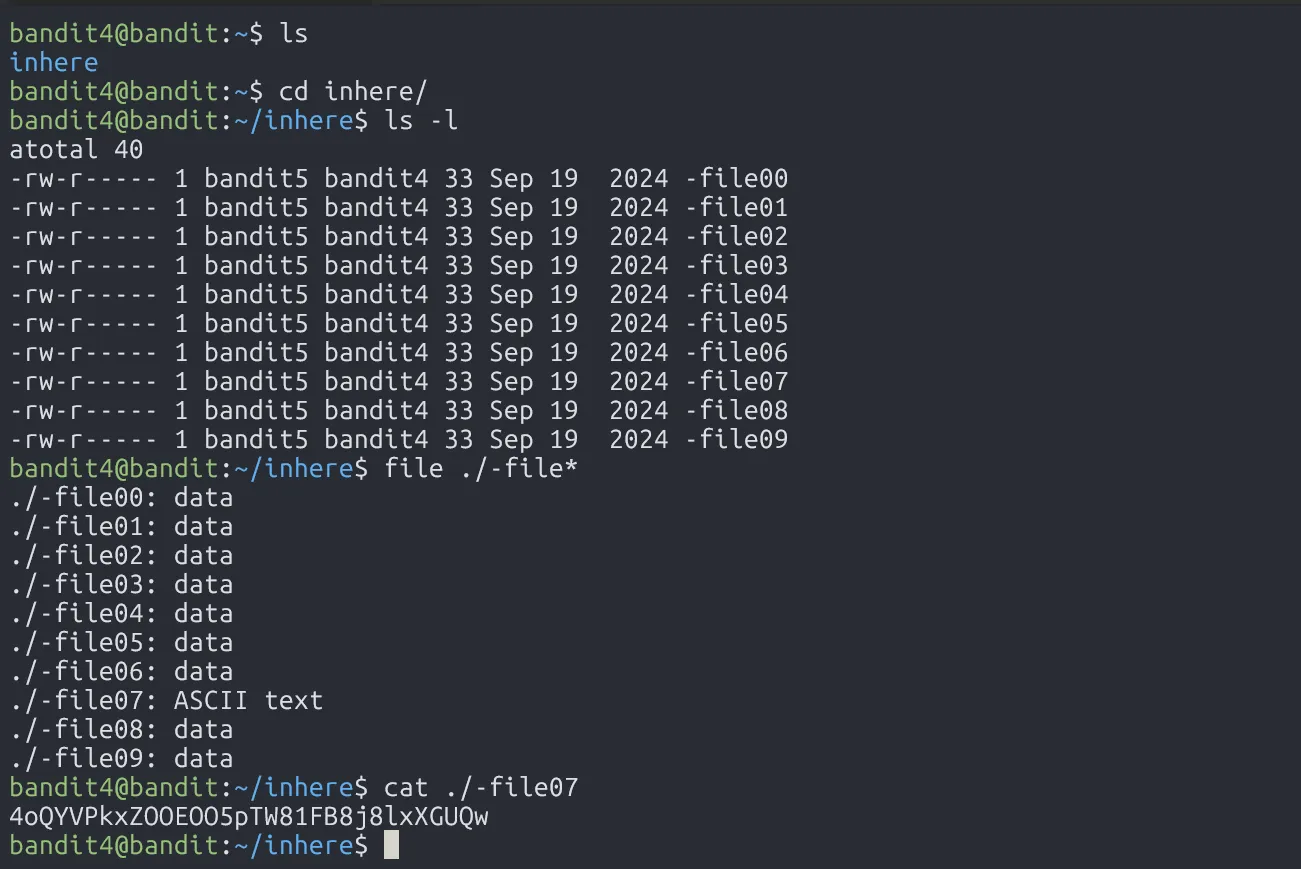
4oQYVPkxZOOEOO5pTW81FB8j8lxXGUQw
Level 5 → Level 6
Level Goal
The password for the next level is stored in a file somewhere under the inhere directory and has all of the following properties:
human-readable
1033 bytes in size
not executable
In inhere, we have other folders.

We can find the file we want by using flags in find.

Read that file and we have the password.

HWasnPhtq9AVKe0dmk45nxy20cvUa6EG
Level 6 → Level 7
Level Goal
The password for the next level is stored somewhere on the server and has all of the following properties:
owned by user bandit7
owned by group bandit6
33 bytes in size
Just like the previous level, we can use the find command with some flags to locate the target file. The phrase “somewhere on the server” hints that we might need to search from the root directory /.
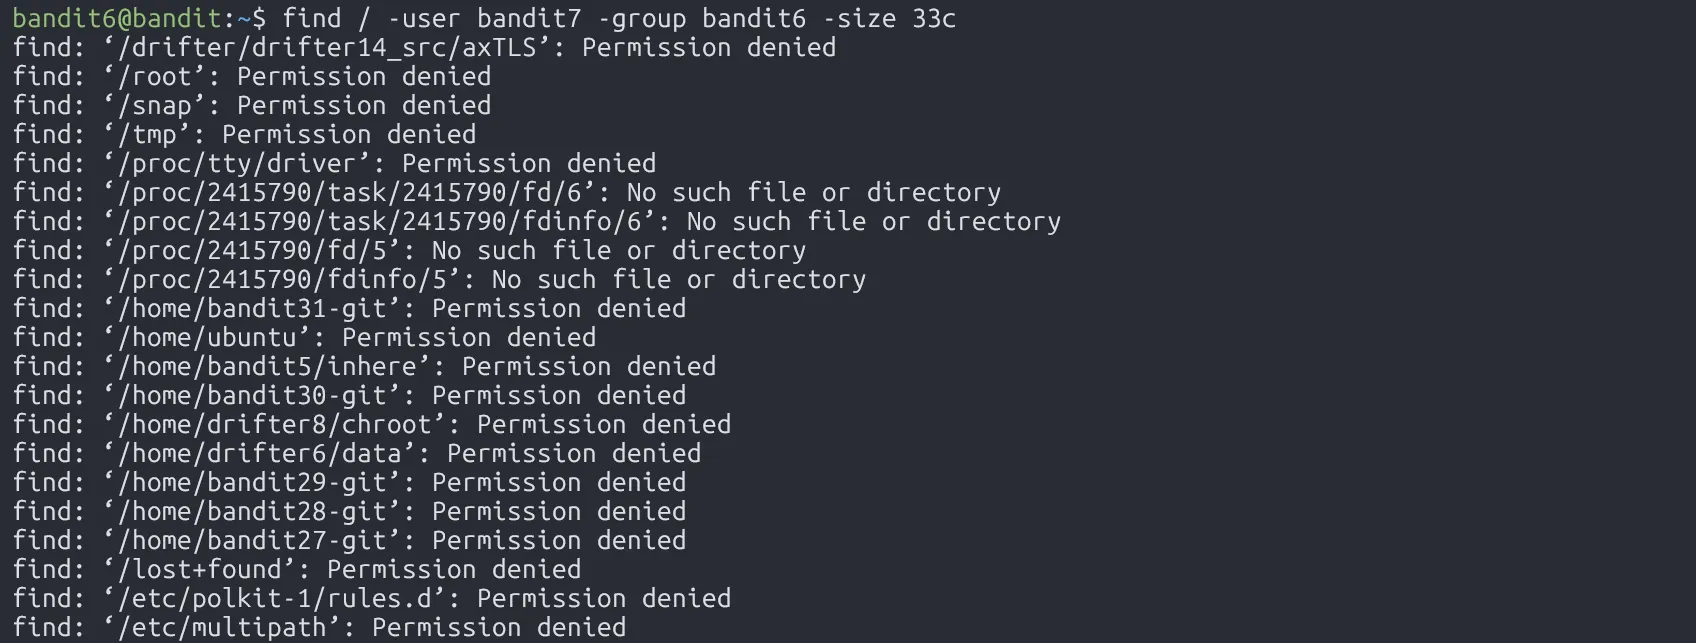
Oh, we get lots of errors printed to stdout. To clean things up, we can redirect stderr to /dev/null.

morbNTDkSW6jIlUc0ymOdMaLnOlFVAaj
Level 7 → Level 8
Level Goal
The password for the next level is stored in the file data.txt next to the word millionth
In this level, we use grep to filter things in file better.

dfwvzFQi4mU0wfNbFOe9RoWskMLg7eEc
Level 8 → Level 9
Level Goal
The password for the next level is stored in the file data.txt and is the only line of text that occurs only once
In this level, we use uniq to find the occurence of line. Since uniq only filters adjacent matching lines, we first need to use the sort command.
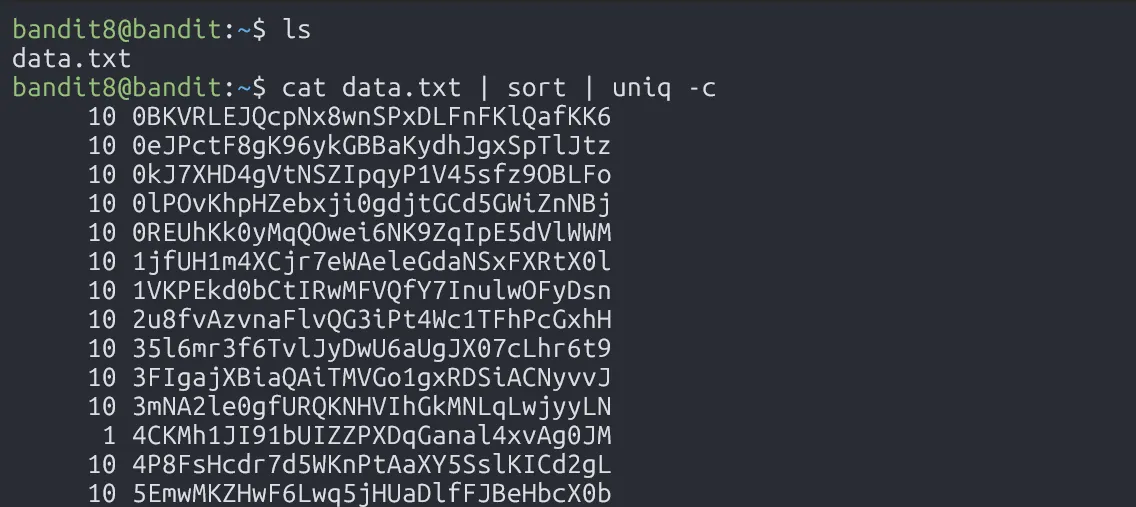
4CKMh1JI91bUIZZPXDqGanal4xvAg0JM
Level 9 → Level 10
Level Goal
The password for the next level is stored in the file data.txt in one of the few human-readable strings, preceded by several ‘=’ characters.
Since data.txt is not an ASCII file, it may contains non-human-readable characters. To get the readable one, we use strings command, and filter it by grep.
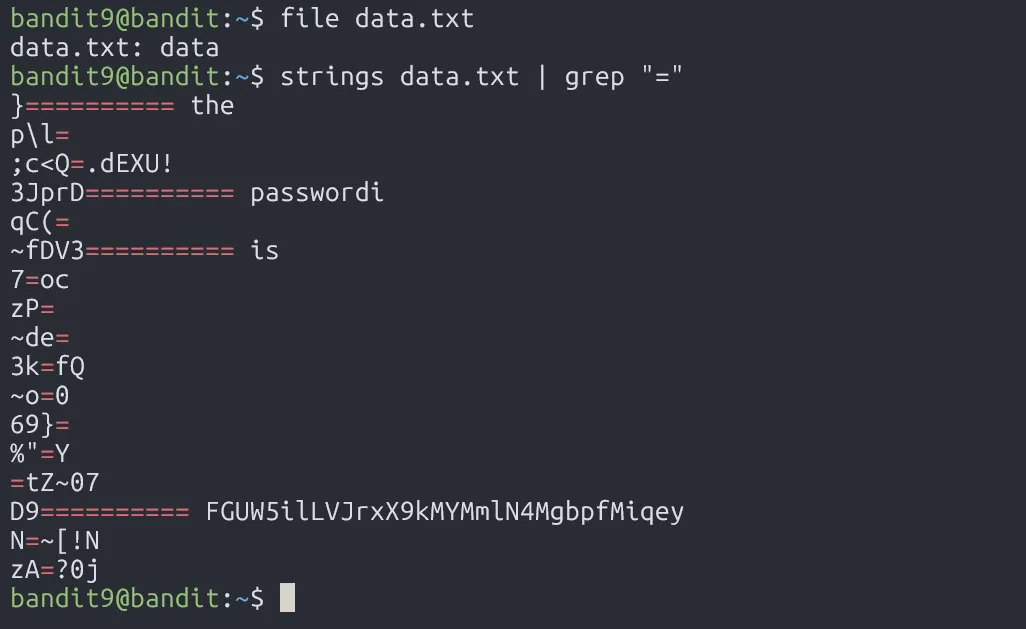
FGUW5ilLVJrxX9kMYMmlN4MgbpfMiqey
Level 10 → Level 11
Level Goal
The password for the next level is stored in the file data.txt, which contains base64 encoded data
Since the content of data.txt contains characters ”==”, which is used in base64 for padding.

To decrypt the file, we use base64 with flag -d.

dtR173fZKb0RRsDFSGsg2RWnpNVj3qRr
Level 11 → Level 12
Level Goal
The password for the next level is stored in the file data.txt, where all lowercase (a-z) and uppercase (A-Z) letters have been rotated by 13 positions
The password is in a file, but it’s encrypted with rot13.

Searching online, here’s how to decrypt it.
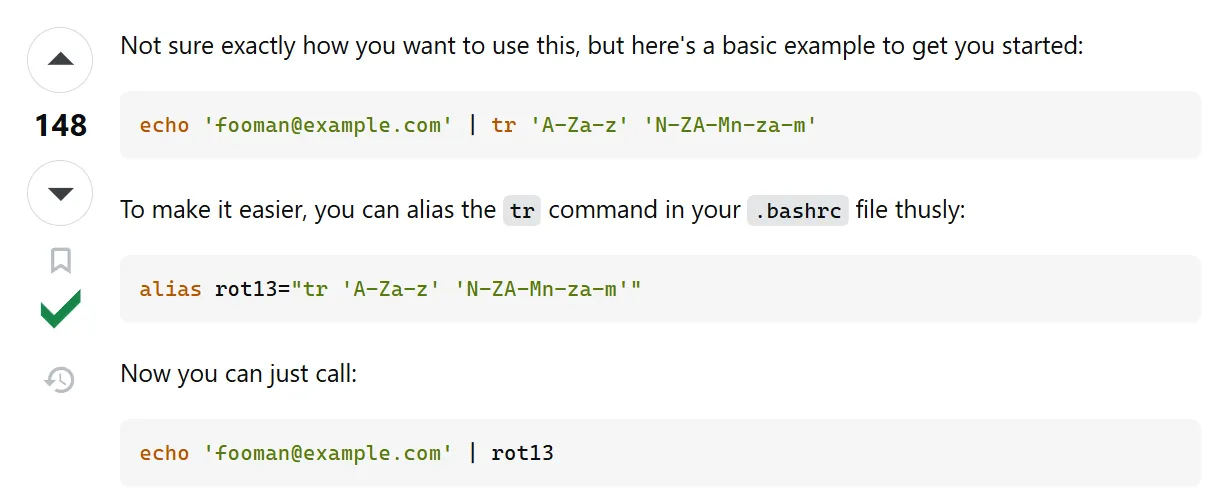
Use tr 'A-Za-z' 'N-ZA-Mn-za-m' to decrypt:

7x16WNeHIi5YkIhWsfFIqoognUTyj9Q4
Level 12 → Level 13
Level Goal
The password for the next level is stored in the file data.txt, which is a hexdump of a file that has been repeatedly compressed. For this level it may be useful to create a directory under /tmp in which you can work. Use mkdir with a hard to guess directory name. Or better, use the command “mktemp -d”. Then copy the datafile using cp, and rename it using mv (read the manpages!)
Since data.txt is a hexdump, we use xxd -r to convert it into binary.

Next, we use the file command to check the file type and figure out how to decompress it.
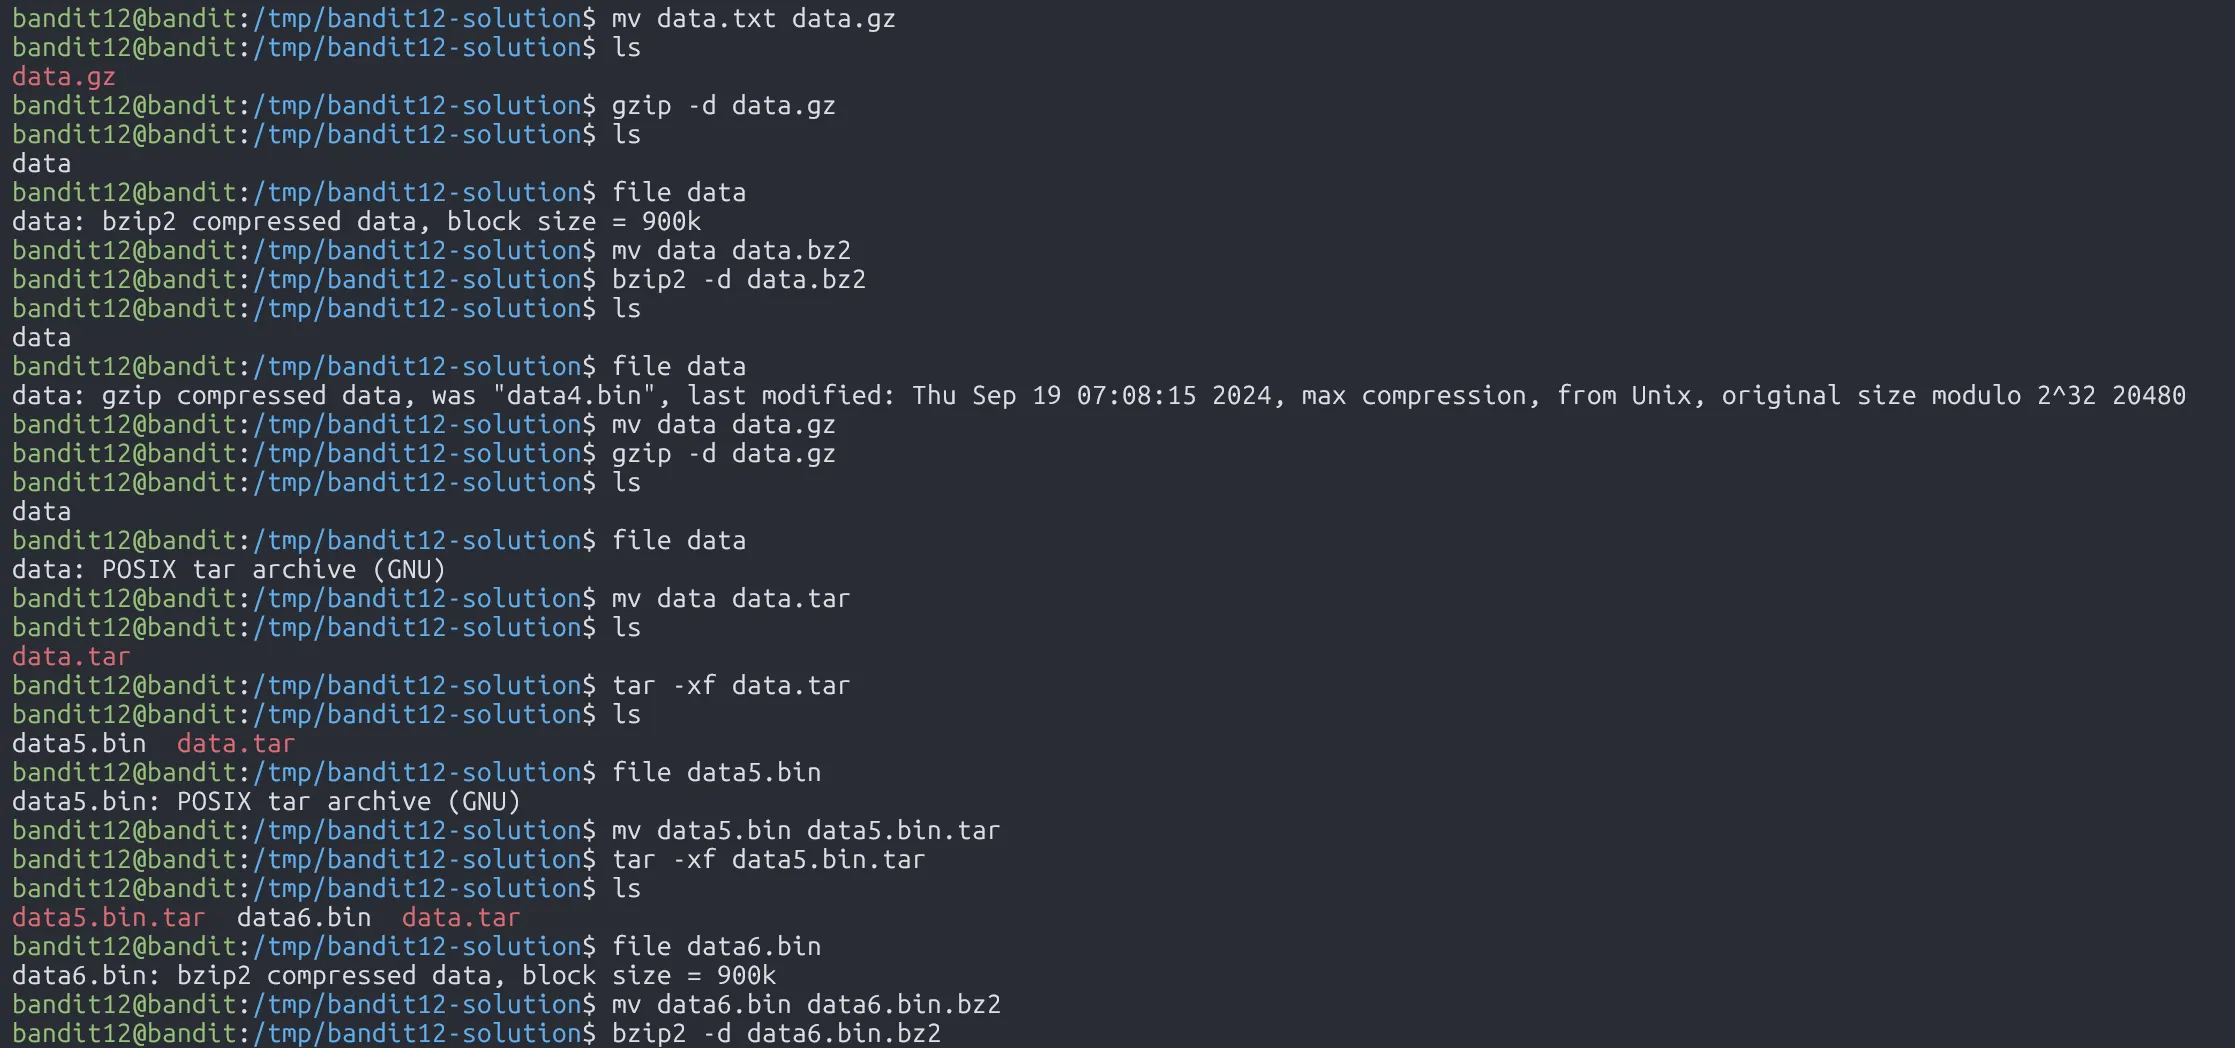

Finally, we find the password file :v

FO5dwFsc0cbaIiH0h8J2eUks2vdTDwAn
Level 13 → Level 14
Level Goal
The password for the next level is stored in /etc/bandit_pass/bandit14 and can only be read by user bandit14. For this level, you don’t get the next password, but you get a private SSH key that can be used to log into the next level. Note: localhost is a hostname that refers to the machine you are working on
As user bandit13, we’re given a private SSH key to log in as bandit14. Use ssh -i to log in with that key

Once logged in, just read the password file:

MU4VWeTyJk8ROof1qqmcBPaLh7lDCPvS
Level 14 → Level 15
Level Goal
The password for the next level can be retrieved by submitting the password of the current level to port 30000 on localhost.
We use nc to connect to port 30000 on localhost, then send bandit14’s password.

8xCjnmgoKbGLhHFAZlGE5Tmu4M2tKJQo
Level 15 → Level 16
Level Goal
The password for the next level can be retrieved by submitting the password of the current level to port 30001 on localhost using SSL/TLS encryption.
Helpful note: Getting “DONE”, “RENEGOTIATING” or “KEYUPDATE”? Read the “CONNECTED COMMANDS” section in the manpage.
To establish a TCP connection using SSL/TLS encryption, we use ncat --ssl.

kSkvUpMQ7lBYyCM4GBPvCvT1BfWRy0Dx
Level 16 → Level 17
Level Goal
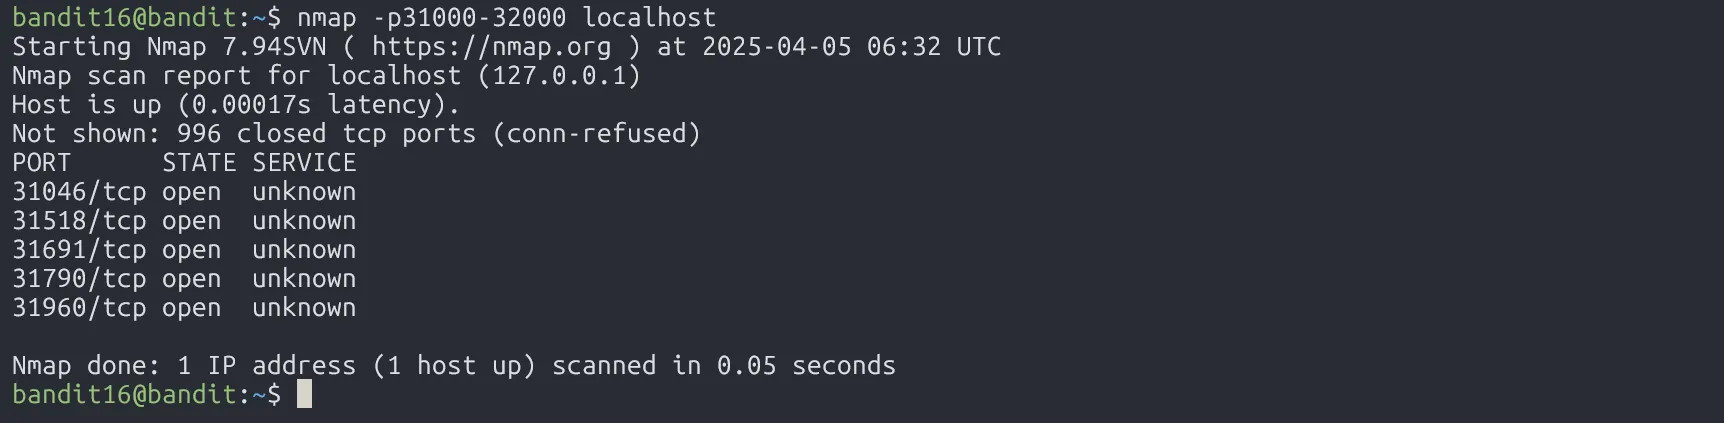
The credentials for the next level can be retrieved by submitting the password of the current level to a port on localhost in the range 31000 to 32000. First find out which of these ports have a server listening on them. Then find out which of those speak SSL/TLS and which don’t. There is only 1 server that will give the next credentials, the others will simply send back to you whatever you send to it.
Helpful note: Getting “DONE”, “RENEGOTIATING” or “KEYUPDATE”? Read the “CONNECTED COMMANDS” section in the manpage.
First, use nmap to scan for open ports between 31000 and 32000:
Then, try connecting to each open port with ncat --ssl to see which one gives valid output:
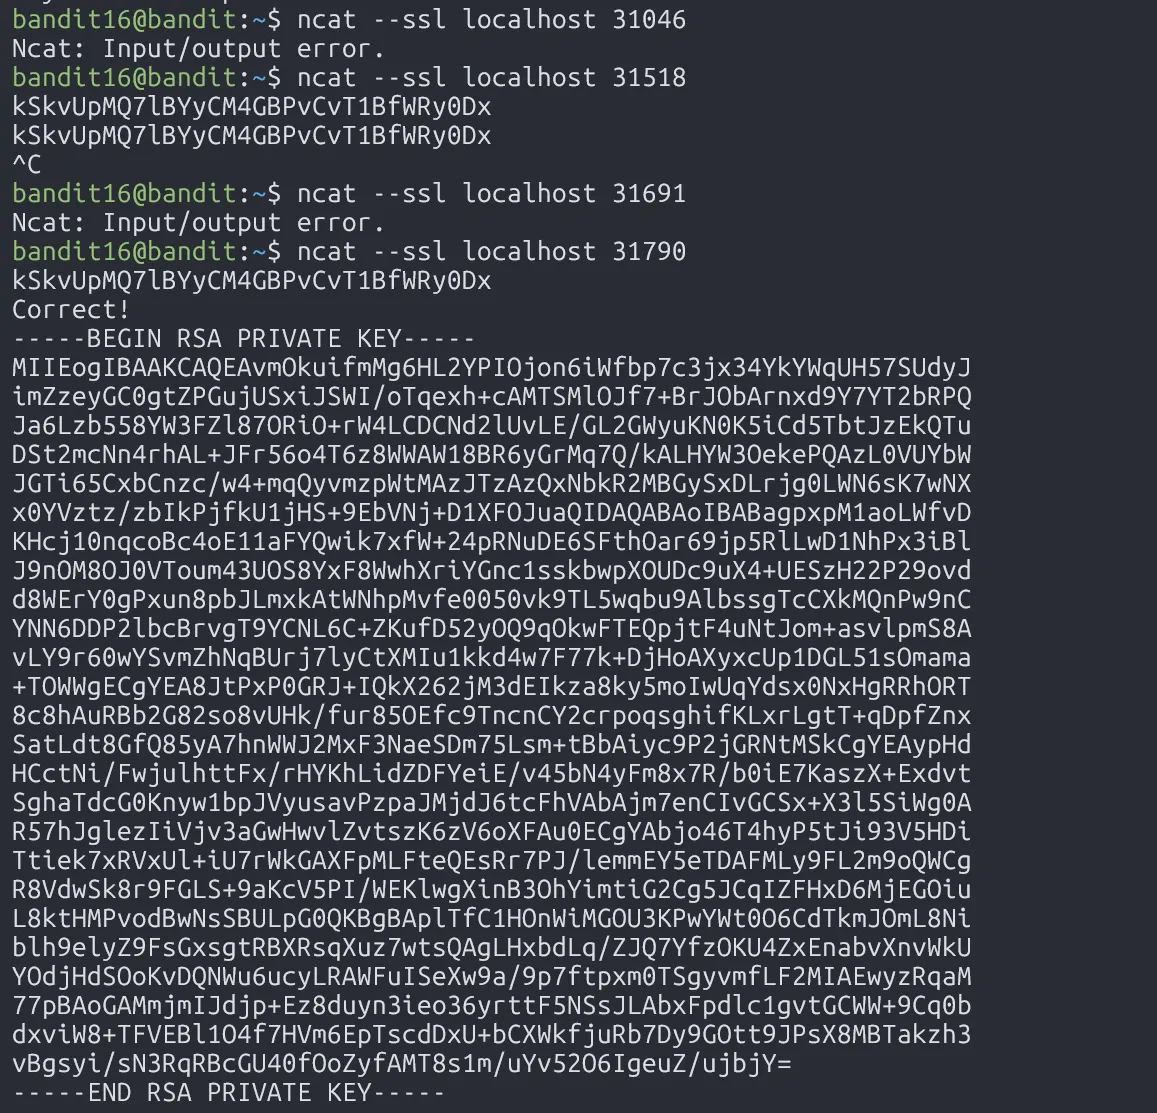
One of the ports returns a private SSH key, use it to log in as bandit17:

Finally, read the password:

EReVavePLFHtFlFsjn3hyzMlvSuSAcRD
Level 17 → Level 18
Level Goal
There are 2 files in the homedirectory: passwords.old and passwords.new. The password for the next level is in passwords.new and is the only line that has been changed between passwords.old and passwords.new
NOTE: if you have solved this level and see ‘Byebye!’ when trying to log into bandit18, this is related to the next level, bandit19
For this level, use diff to compare the changes between passwords.old and passwords.new.
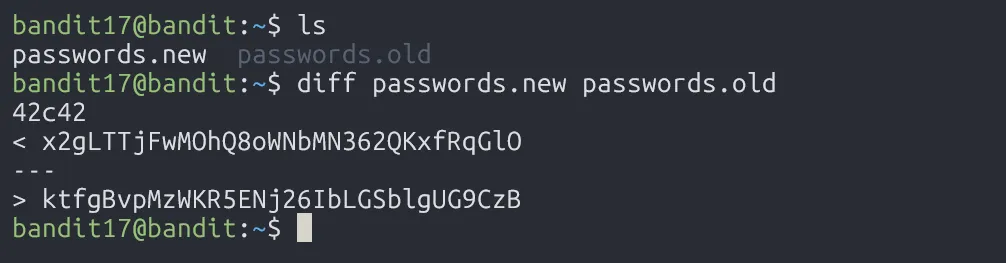
x2gLTTjFwMOhQ8oWNbMN362QKxfRqGlO
Level 18 → Level 19
Level Goal
The password for the next level is stored in a file readme in the homedirectory. Unfortunately, someone has modified .bashrc to log you out when you log in with SSH.
As expected, logging into bandit18 immediately shows “Byebye!” because .bashrc logs us out.

To bypass this, use ssh -t to force a terminal, and run a clean shell with bash --norc to avoid loading .bashrc:
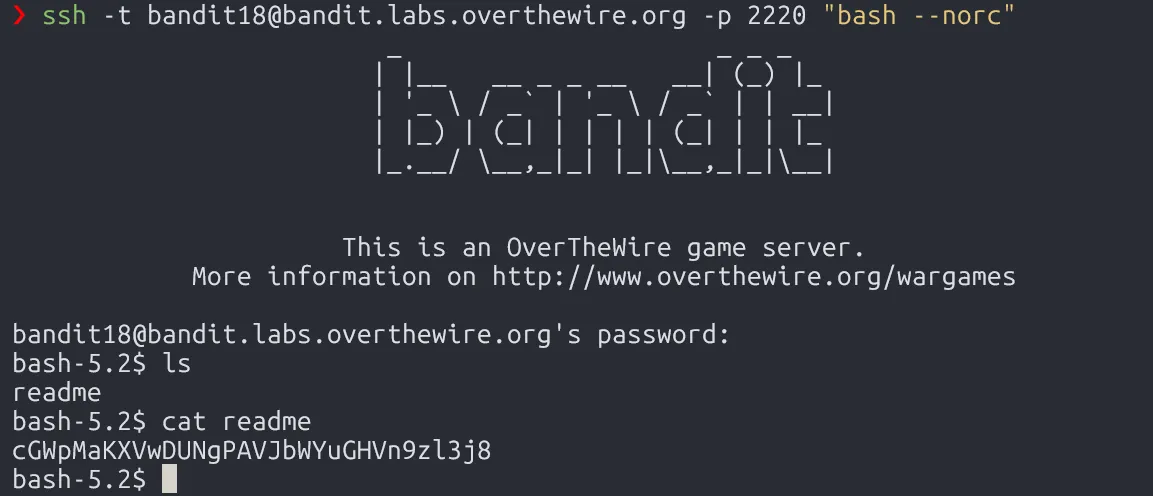
cGWpMaKXVwDUNgPAVJbWYuGHVn9zl3j8
Level 19 → Level 20
Level Goal
To gain access to the next level, you should use the setuid binary in the homedirectory. Execute it without arguments to find out how to use it. The password for this level can be found in the usual place (/etc/bandit_pass), after you have used the setuid binary.
The file bandit20-do has the setuid bit set and is owned by bandit20, meaning we can run it with bandit20’s privileges.

0qXahG8ZjOVMN9Ghs7iOWsCfZyXOUbYO
Level 20 → Level 21
Level Goal
There is a setuid binary in the homedirectory that does the following: it makes a connection to localhost on the port you specify as a commandline argument. It then reads a line of text from the connection and compares it to the password in the previous level (bandit20). If the password is correct, it will transmit the password for the next level (bandit21).
NOTE: Try connecting to your own network daemon to see if it works as you think
This level simulates Client-Server Communication.
We set up a local Server using nc -l -p <port> that sends the bandit20 password when a Client connects. The setuid binary ./suconnect acts as the Client and connects to our server. If the password is correct, we’ll get back the next level’s password.

EeoULMCra2q0dSkYj561DX7s1CpBuOBt
Level 21 → Level 22
Level Goal
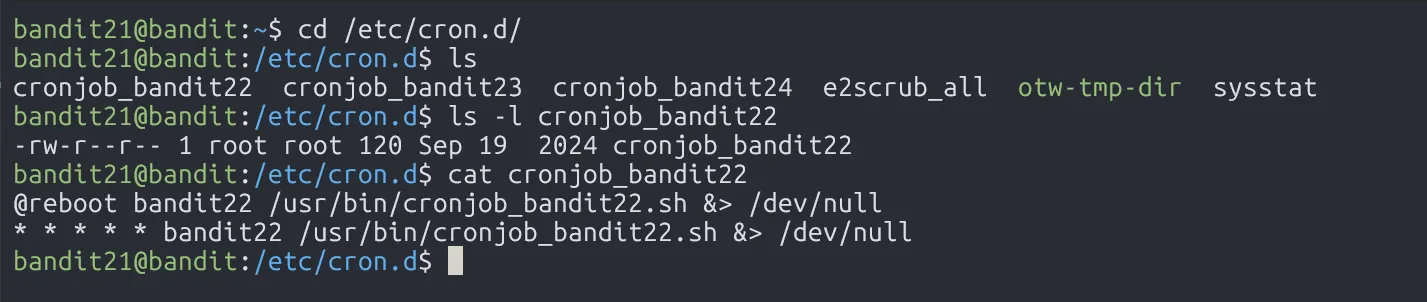
A program is running automatically at regular intervals from cron, the time-based job scheduler. Look in /etc/cron.d/ for the configuration and see what command is being executed.
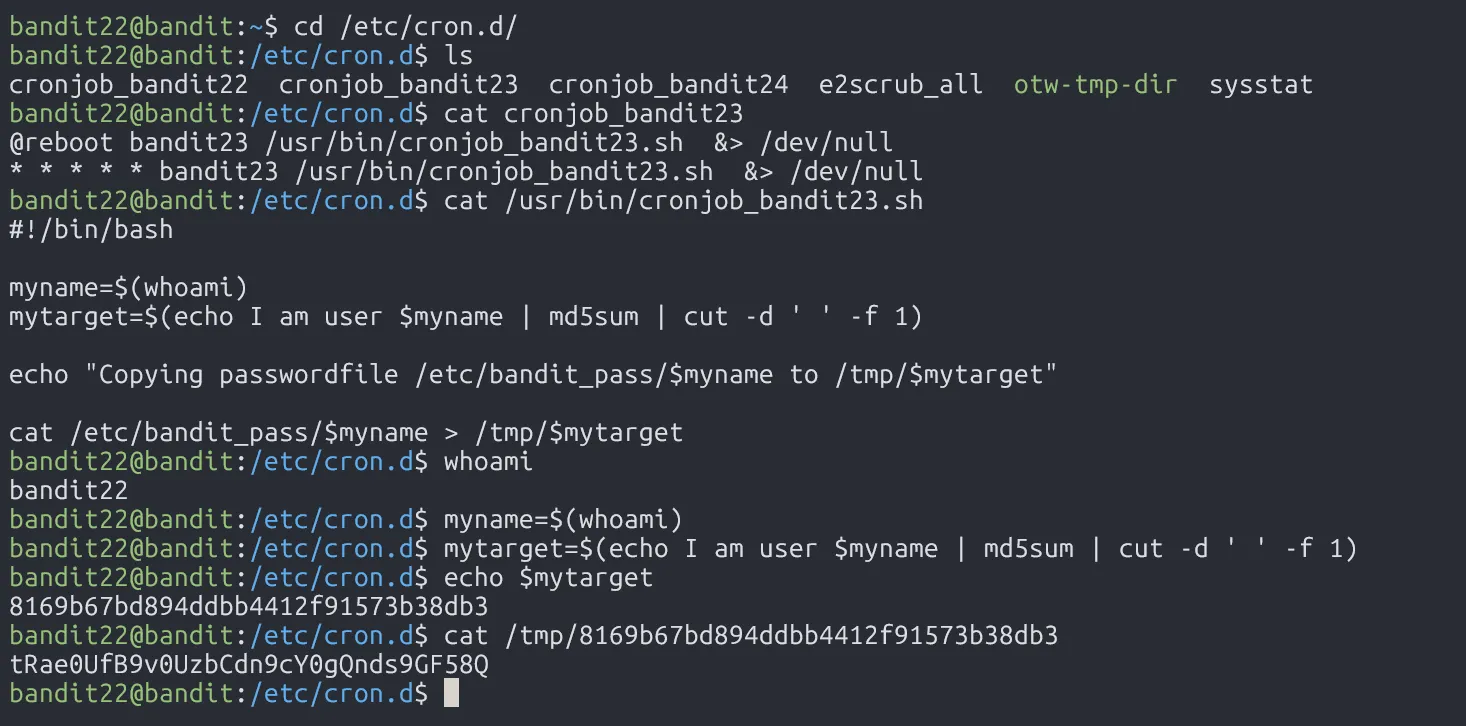
First, we change directory to /etc/cron.d/, and find out there is a file named cronjob_bandit22. In this file, it has established a scheduler file /usr/bin/cronjob_bandit22.sh which runs for every minute with user bandit22 privileges.
Let’s read that scheduler file.

Looks like the password for user bandit22 is stored into file /tmp/t7O6lds9S0RqQh9aMcz6ShpAoZKF7fgv. Just read that file and we get the password.

tRae0UfB9v0UzbCdn9cY0gQnds9GF58Q
Level 22 → Level 23
Level Goal
A program is running automatically at regular intervals from cron, the time-based job scheduler. Look in /etc/cron.d/ for the configuration and see what command is being executed.
NOTE: Looking at shell scripts written by other people is a very useful skill. The script for this level is intentionally made easy to read. If you are having problems understanding what it does, try executing it to see the debug information it prints.
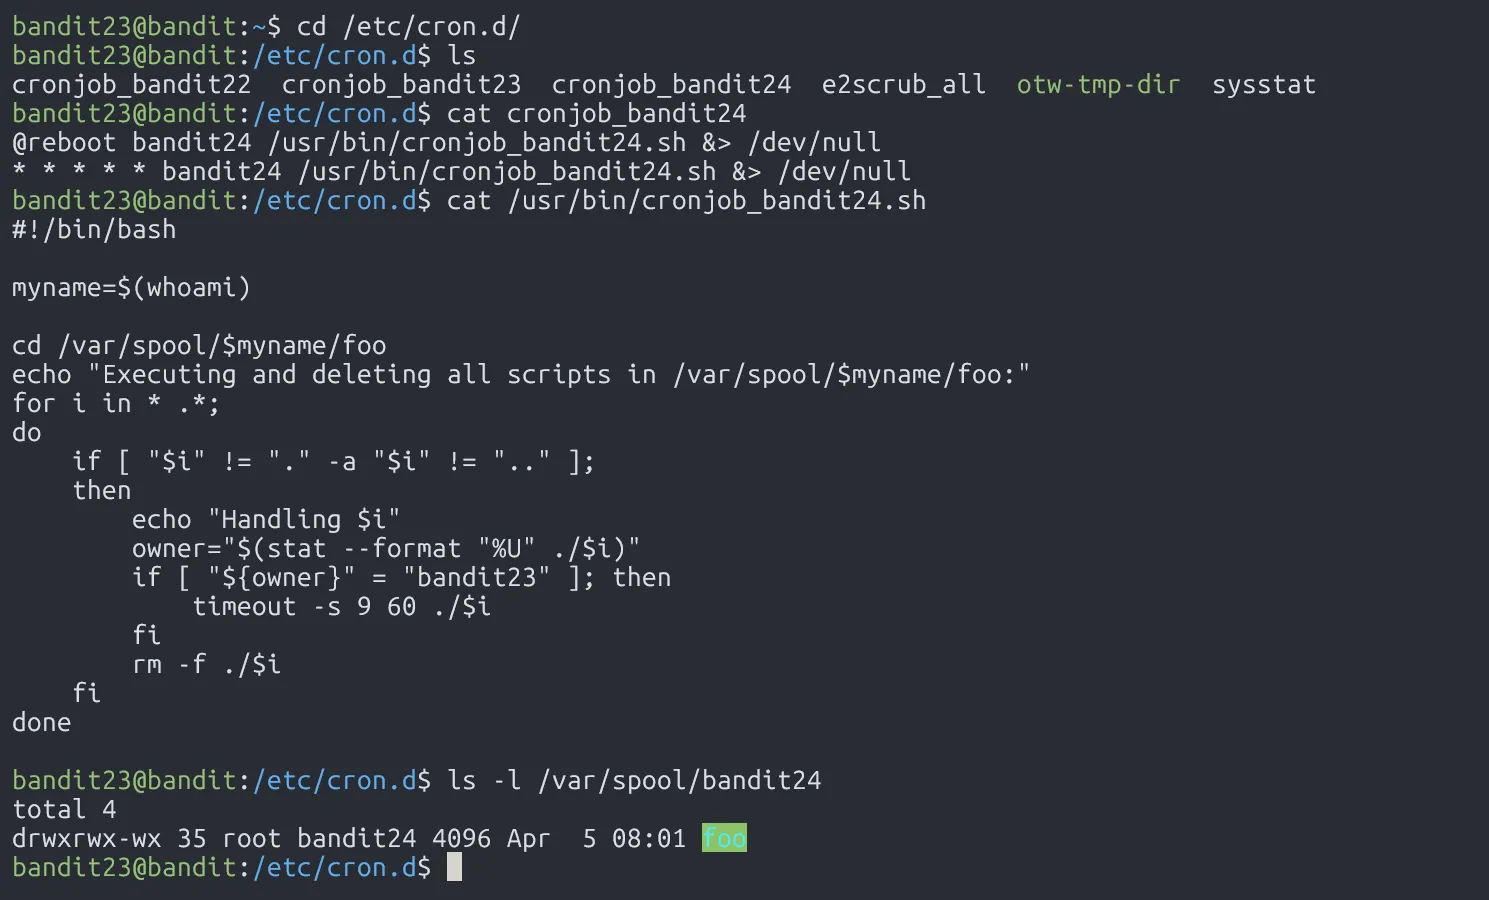
Like previous level, there’s a scheduler file, /usr/bin/cronjob_bandit23.sh, which runs for every minute with user bandit23 privileges.
However, the file that stored the password for the next level is calculated based on the myname variable, which stores the name of current user, and mytarget (password file) is being hashed. In the below picture, we use user bandit22, and we get the password file for user bandit22.
Since that scheduler file is run as user bandit23 privileges, it will use user bandit23 as the value of myname variable, and mytarget will be the hashed password file that we need.

0Zf11ioIjMVN551jX3CmStKLYqjk54Ga
Level 23 → Level 24
Level Goal
A program is running automatically at regular intervals from cron, the time-based job scheduler. Look in /etc/cron.d/ for the configuration and see what command is being executed.
NOTE: This level requires you to create your own first shell-script. This is a very big step and you should be proud of yourself when you beat this level!
NOTE 2: Keep in mind that your shell script is removed once executed, so you may want to keep a copy around…
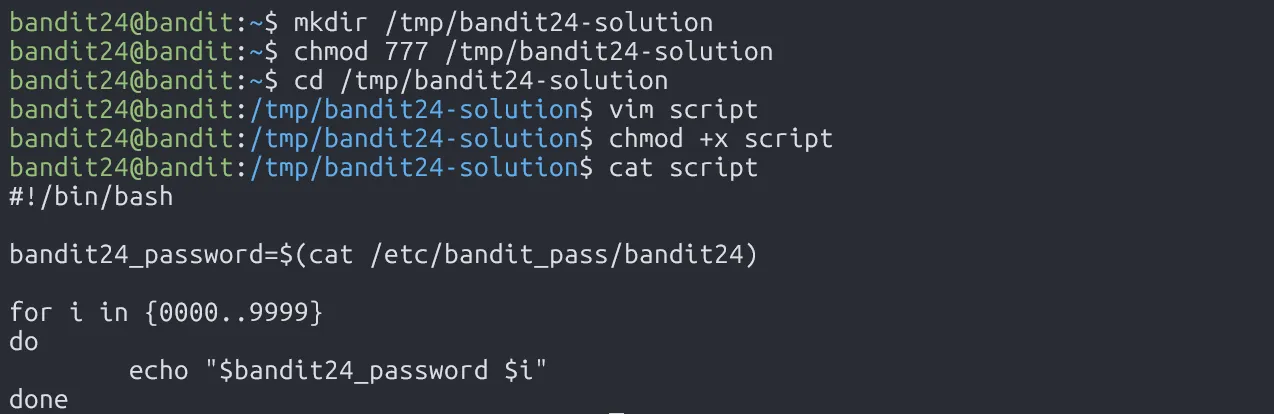
Another job scheduler challenge, this time, the scheduler file is /usr/bin/cronjob_bandit24.sh, running every minute with user bandit24 privileges.
The scheduler file simply checks all the files in /var/spool/bandit24/foo (including hidden ones). If the file belongs to user bandit23, it gets executed (with a 60s timeout) and deleted right after.
To solve this, we create a script in /tmp that reads the password into result.txt, make it executable, then move it to /var/spool/bandit24/foo. Wait a minute, and the cronjob will do the rest!

gb8KRRCsshuZXI0tUuR6ypOFjiZbf3G8
Level 24 → Level 25
Level Goal
A daemon is listening on port 30002 and will give you the password for bandit25 if given the password for bandit24 and a secret numeric 4-digit pincode. There is no way to retrieve the pincode except by going through all of the 10000 combinations, called brute-forcing.
You do not need to create new connections each time
First, let’s establish a TCP connection on port 30002 to see what happens.

We have to enter the password for user bandit24 and a pincode (4-digit). To get the correct pincode, we could use the bruteforce method!
Run the script and get the password.

iCi86ttT4KSNe1armKiwbQNmB3YJP3q4
Level 25 → Level 26
Level Goal
Logging in to bandit26 from bandit25 should be fairly easy… The shell for user bandit26 is not /bin/bash, but something else. Find out what it is, how it works and how to break out of it.
NOTE: if you’re a Windows user and typically use Powershell to ssh into bandit: Powershell is known to cause issues with the intended solution to this level. You should use command prompt instead.

We have the private SSH key for bandit26, but the shell isn’t /bin/bash, so login fails.

To see what shell bandit26 uses, check /etc/passwd:

Turns out, it runs more /home/bandit26/text.txt on login, which shows a banner. But since it’s using more, we can trigger a trick: shrink the terminal size to overload the buffer, then press v to enter vim, and use :e to read the password file.


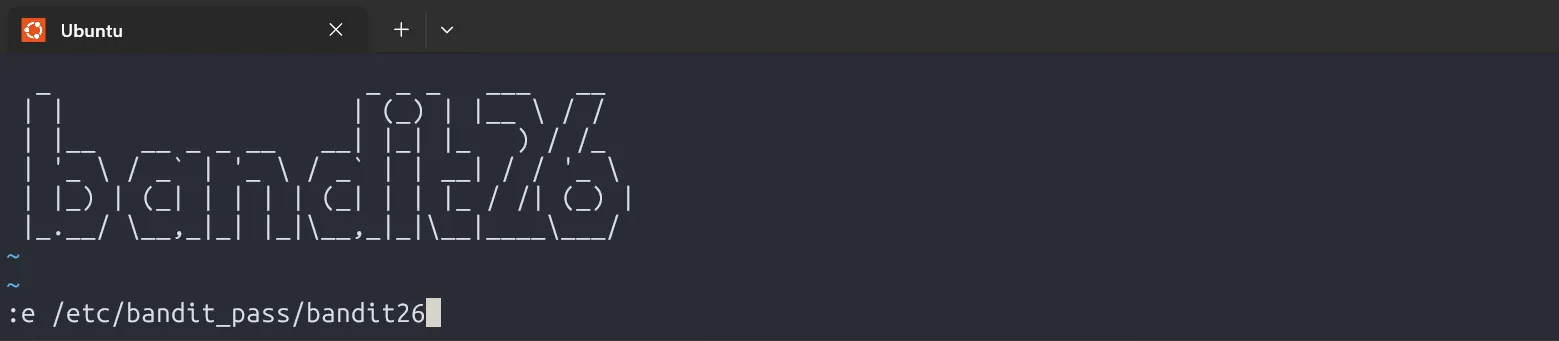
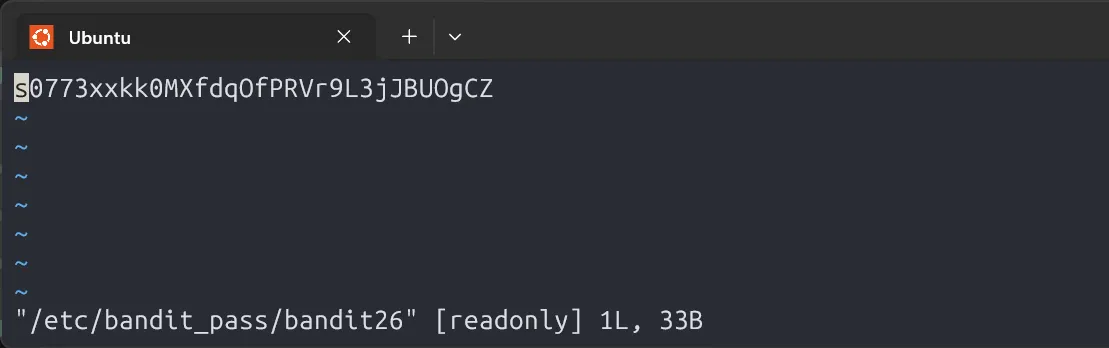
s0773xxkk0MXfdqOfPRVr9L3jJBUOgCZ
Level 26 → Level 27
Level Goal
Good job getting a shell! Now hurry and grab the password for bandit27!
In this level, we use the trick from previous level, shrinking the terminal to overflow more, press v to enter vim, then set the shell to /bin/bash and read the password.


upsNCc7vzaRDx6oZC6GiR6ERwe1MowGB
Level 27 → Level 28
Level Goal
There is a git repository at ssh://bandit27-git@localhost/home/bandit27-git/repo via the port 2220. The password for the user bandit27-git is the same as for the user bandit27.
Clone the repository and find the password for the next level.
When successfully cloning the repository, we can get the password.
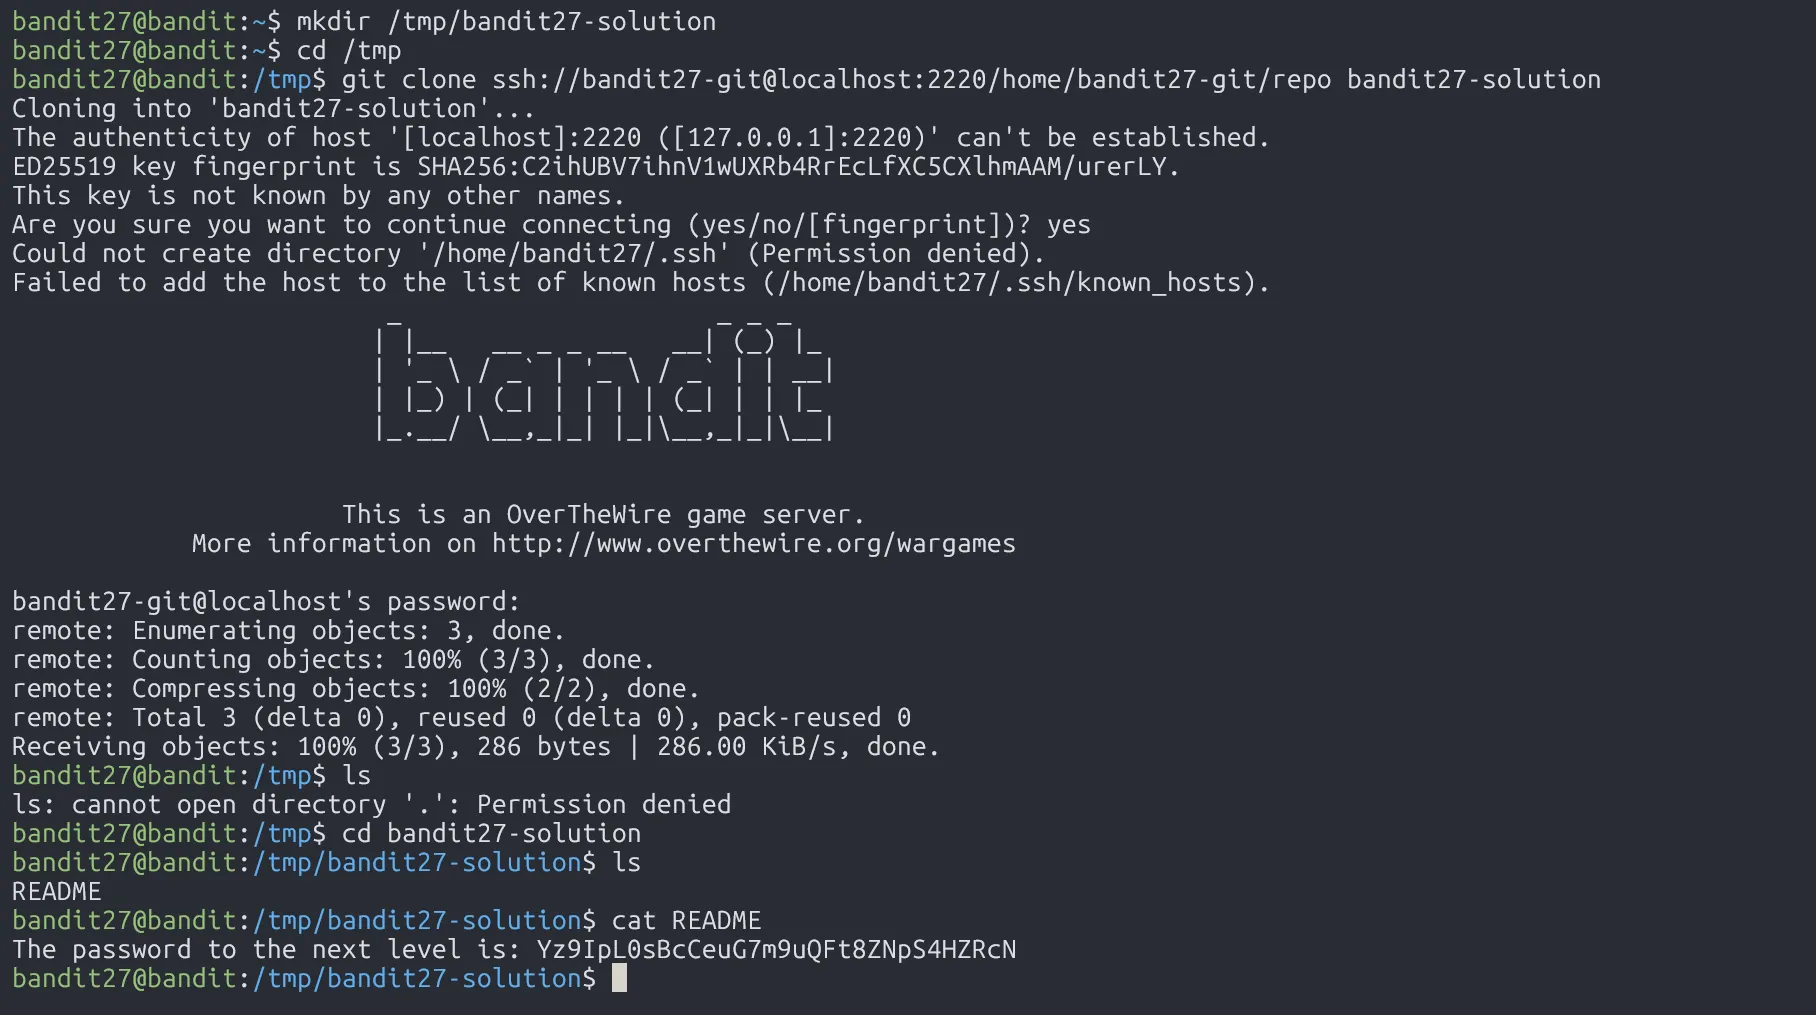
Yz9IpL0sBcCeuG7m9uQFt8ZNpS4HZRcN
Level 28 → Level 29
Level Goal
There is a git repository at ssh://bandit28-git@localhost/home/bandit28-git/repo via the port 2220. The password for the user bandit28-git is the same as for the user bandit28.
Clone the repository and find the password for the next level.
Clone the repo
→ the README.md file is changed during cloning process
→ git log README.md
→ git show <hash-commit>
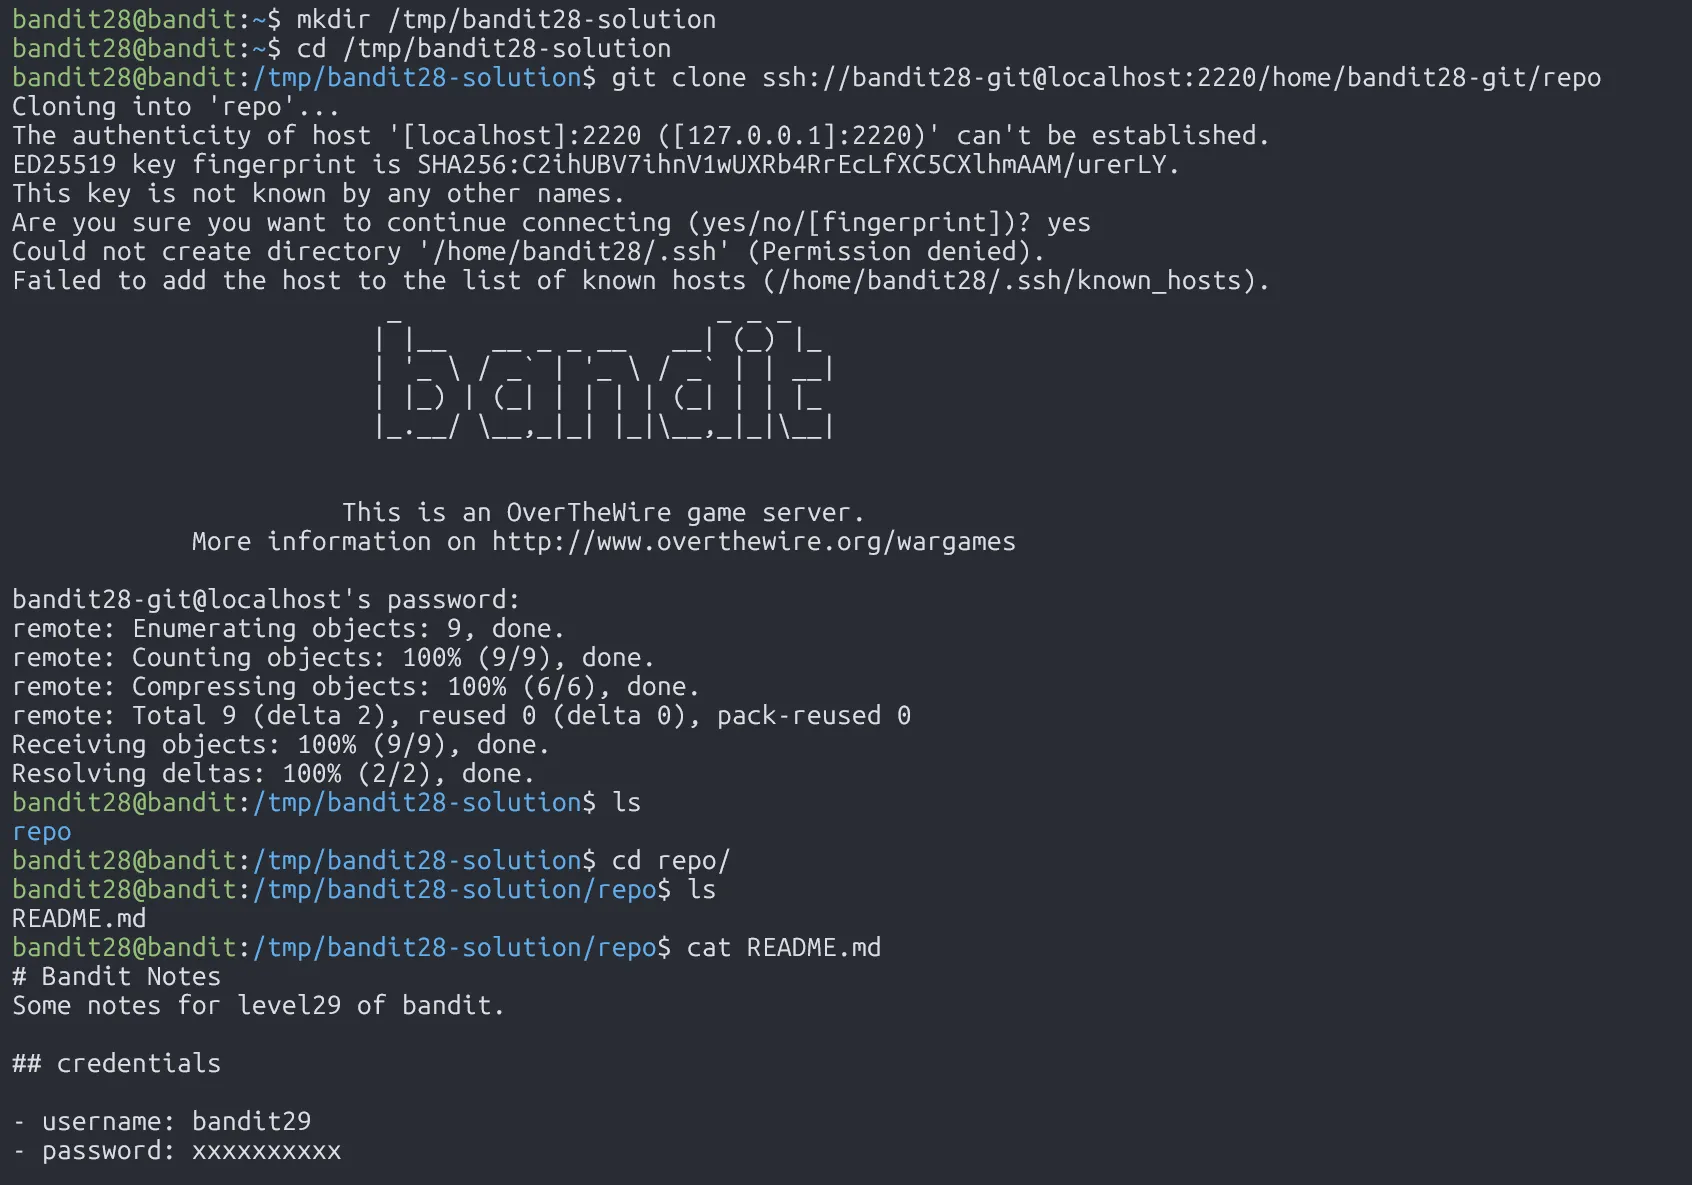

4pT1t5DENaYuqnqvadYs1oE4QLCdjmJ7
Level 29 → Level 30
Level Goal
There is a git repository at ssh://bandit29-git@localhost/home/bandit29-git/repo via the port 2220. The password for the user bandit29-git is the same as for the user bandit29.
Clone the repository and find the password for the next level.
In this level, we learn how to use branches in git, which allows us to work on different parts of a project independently.
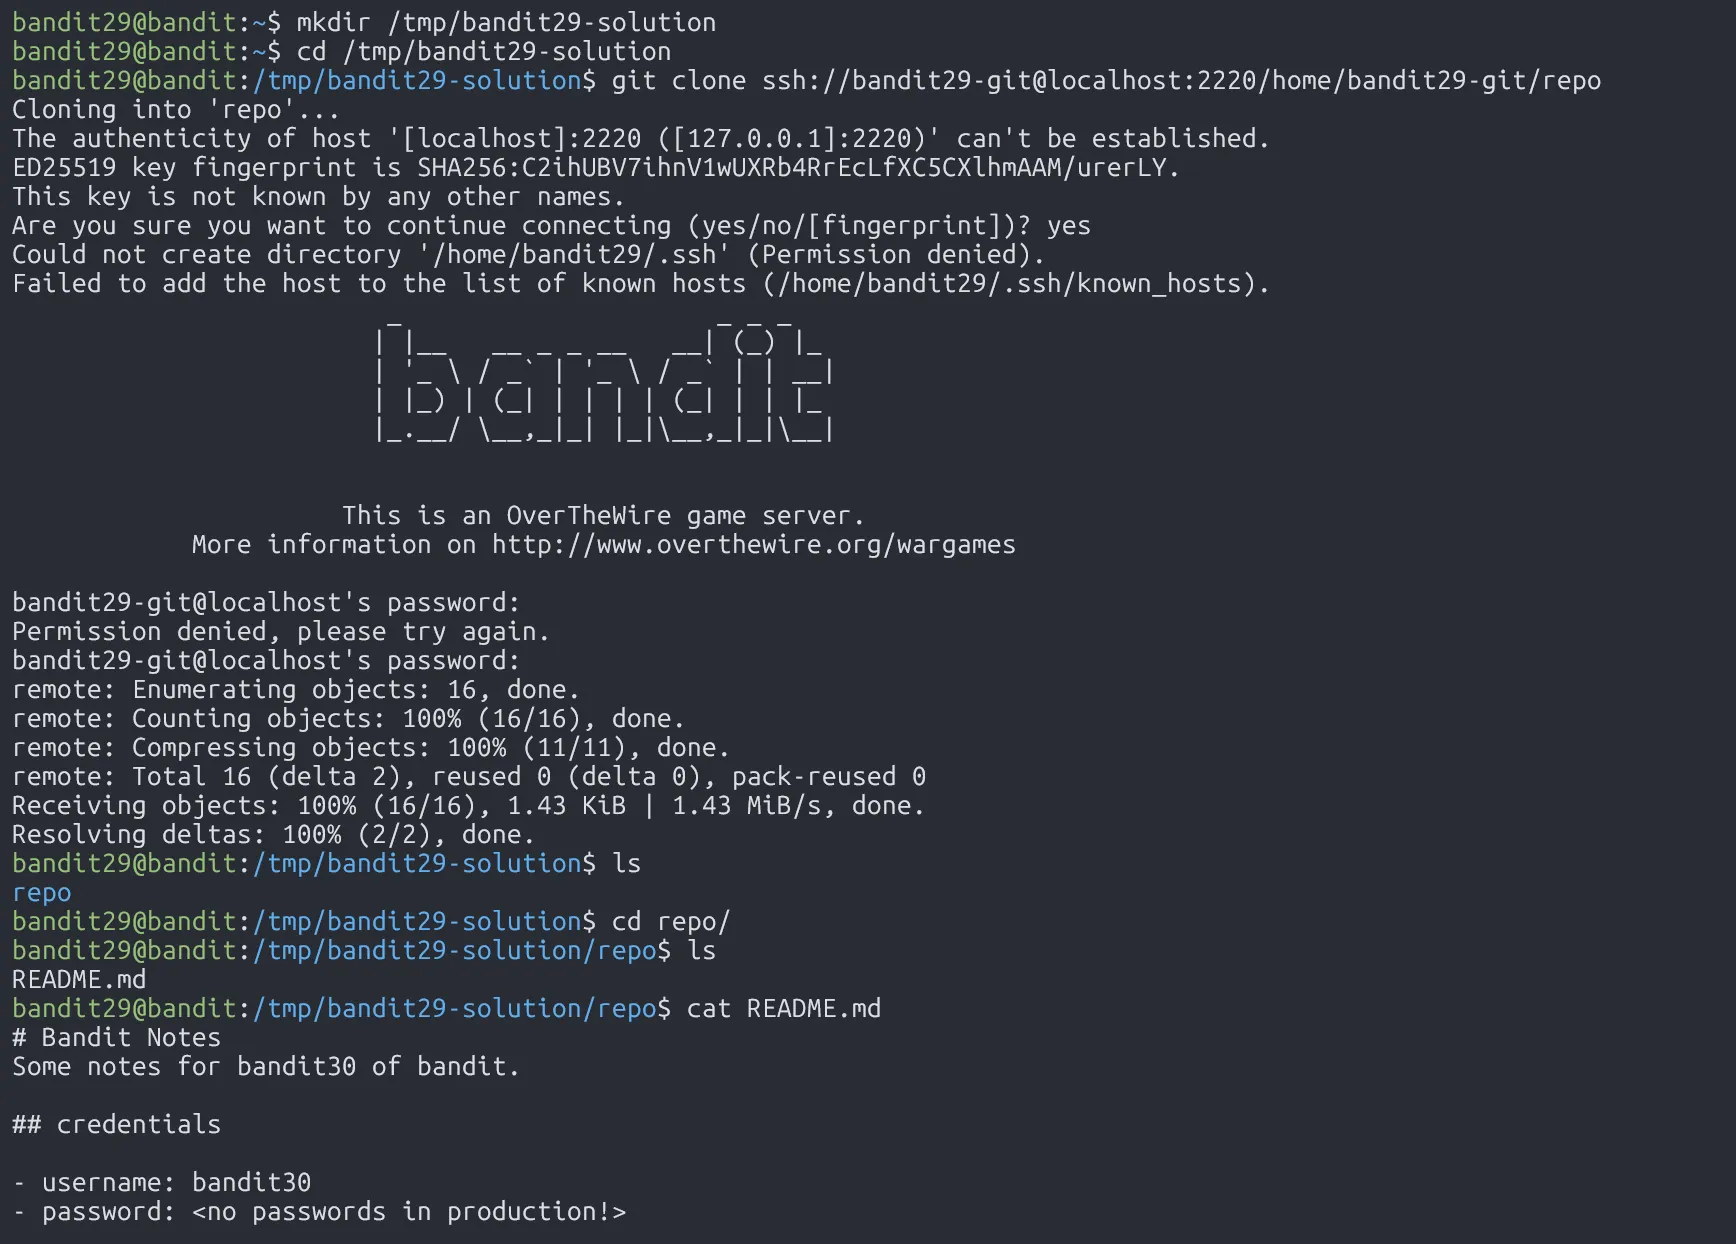
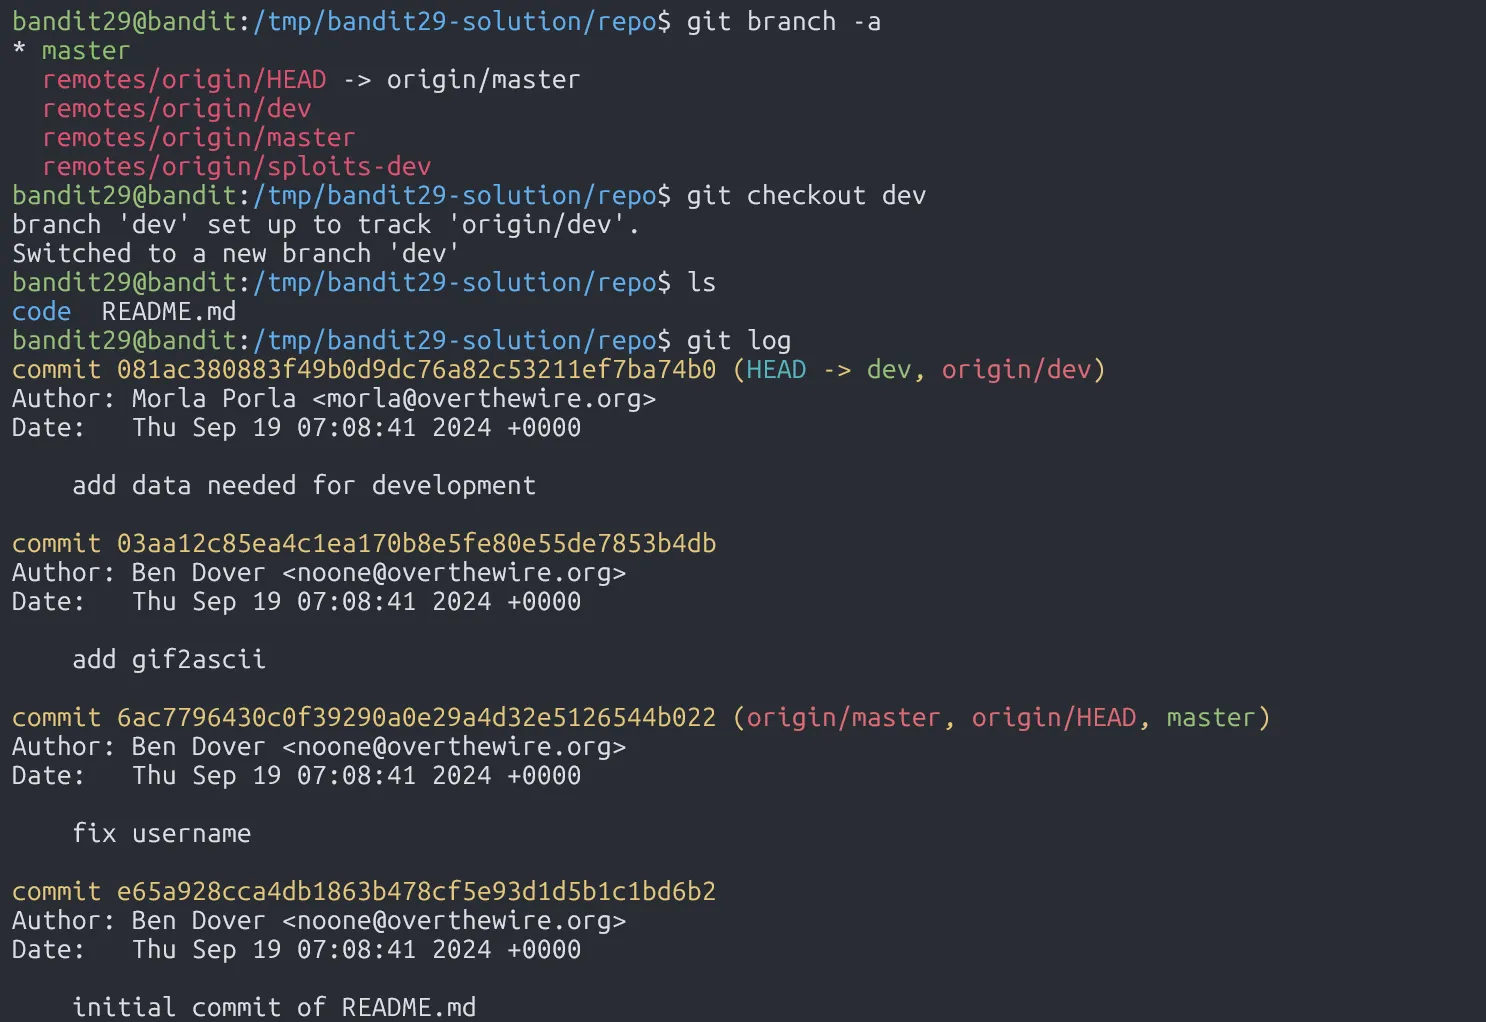

qp30ex3VLz5MDG1n91YowTv4Q8l7CDZL
Level 30 → Level 31
Level Goal
There is a git repository at ssh://bandit30-git@localhost/home/bandit30-git/repo via the port 2220. The password for the user bandit30-git is the same as for the user bandit30.
Clone the repository and find the password for the next level.
In this level, we learn about tag in git, which will be used to store important information like the password or other confidential data.

Since there is nothing we can exploit in git log and git branch, we can try to check tag in git.

fb5S2xb7bRyFmAvQYQGEqsbhVyJqhnDy
Level 31 → Level 32
Level Goal
There is a git repository at ssh://bandit31-git@localhost/home/bandit31-git/repo via the port 2220. The password for the user bandit31-git is the same as for the user bandit31.
Clone the repository and find the password for the next level.
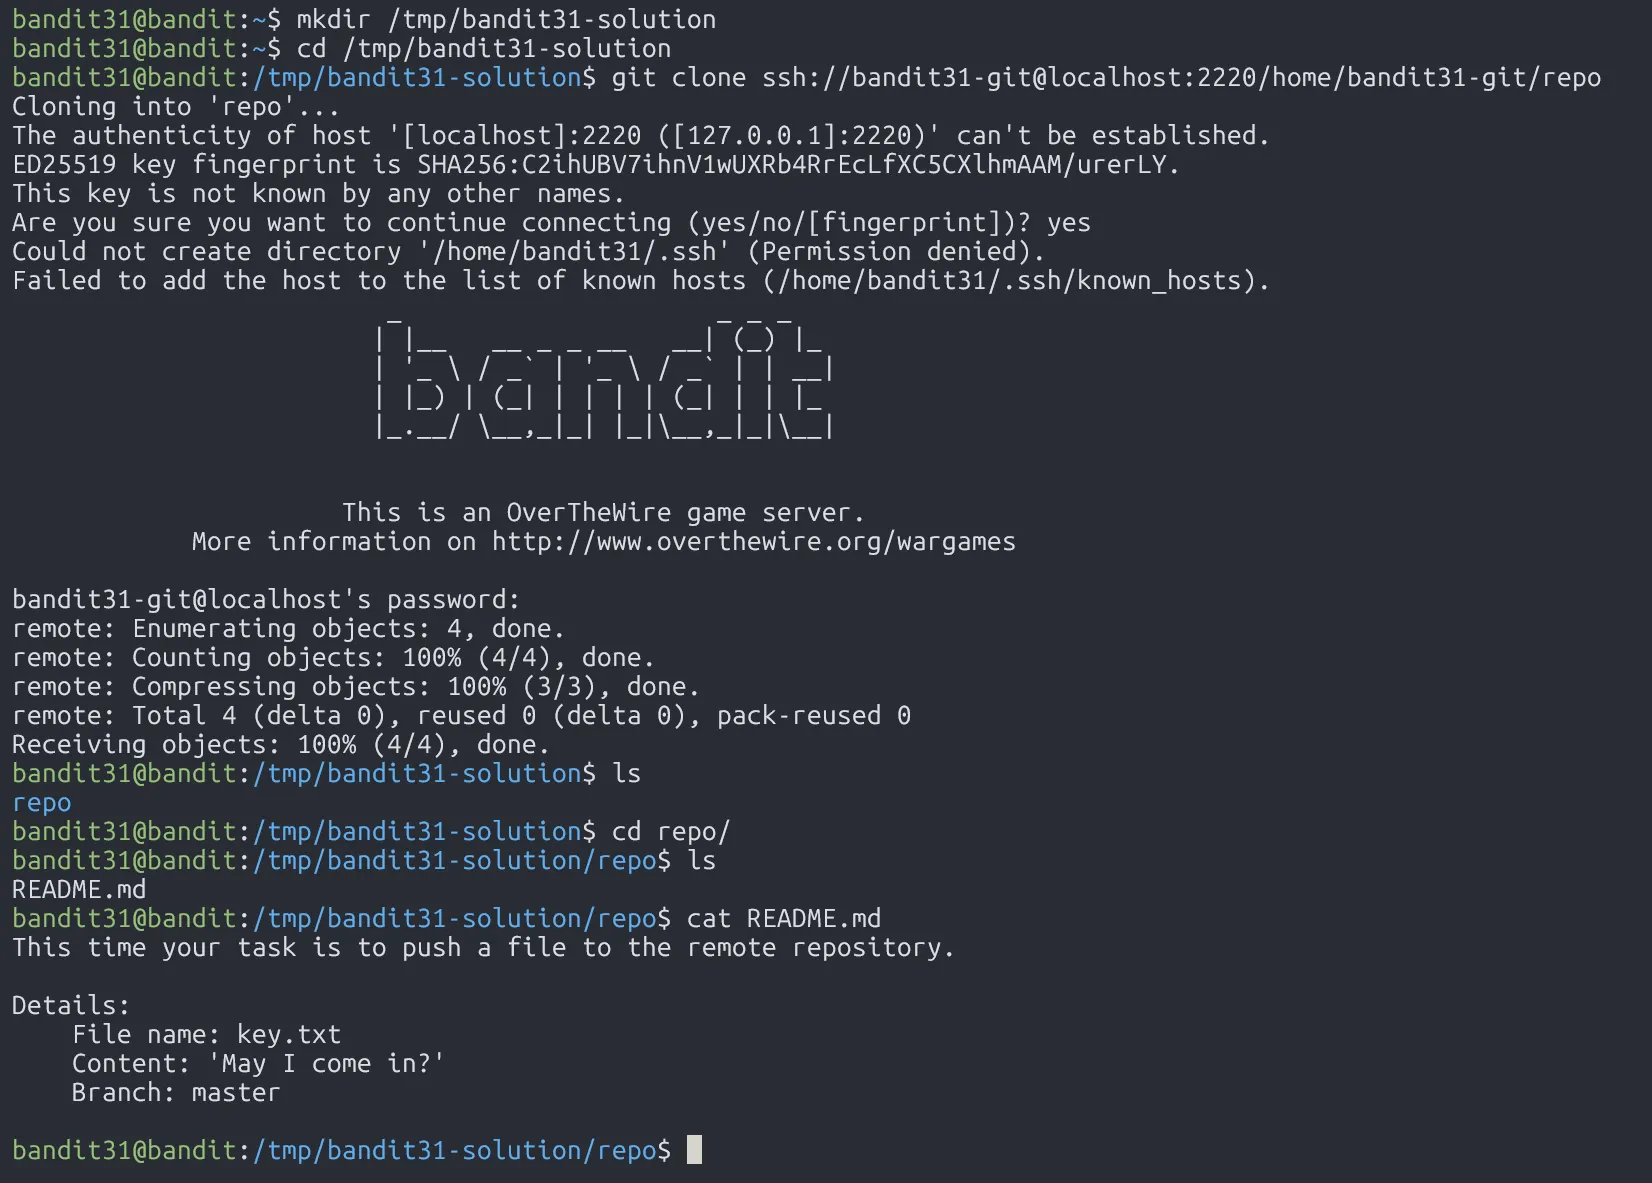
We are asked to push file key.txt to the repo. If we successfully in that, we can get the password.
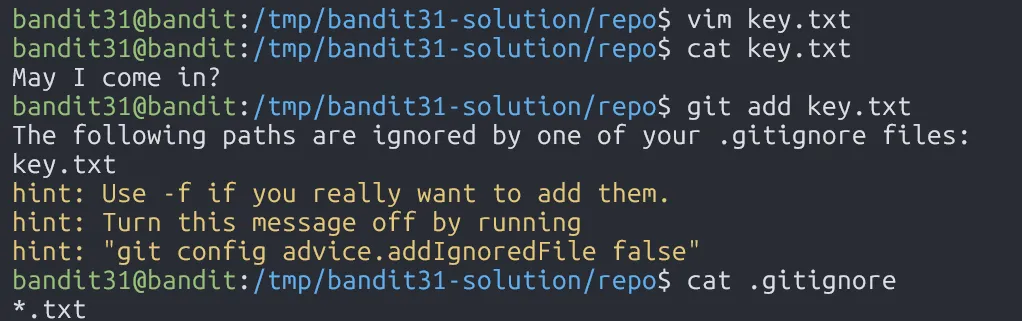
Since our file key.txt is ignored due to .gitignore, we can bypass this by using the flag -f.

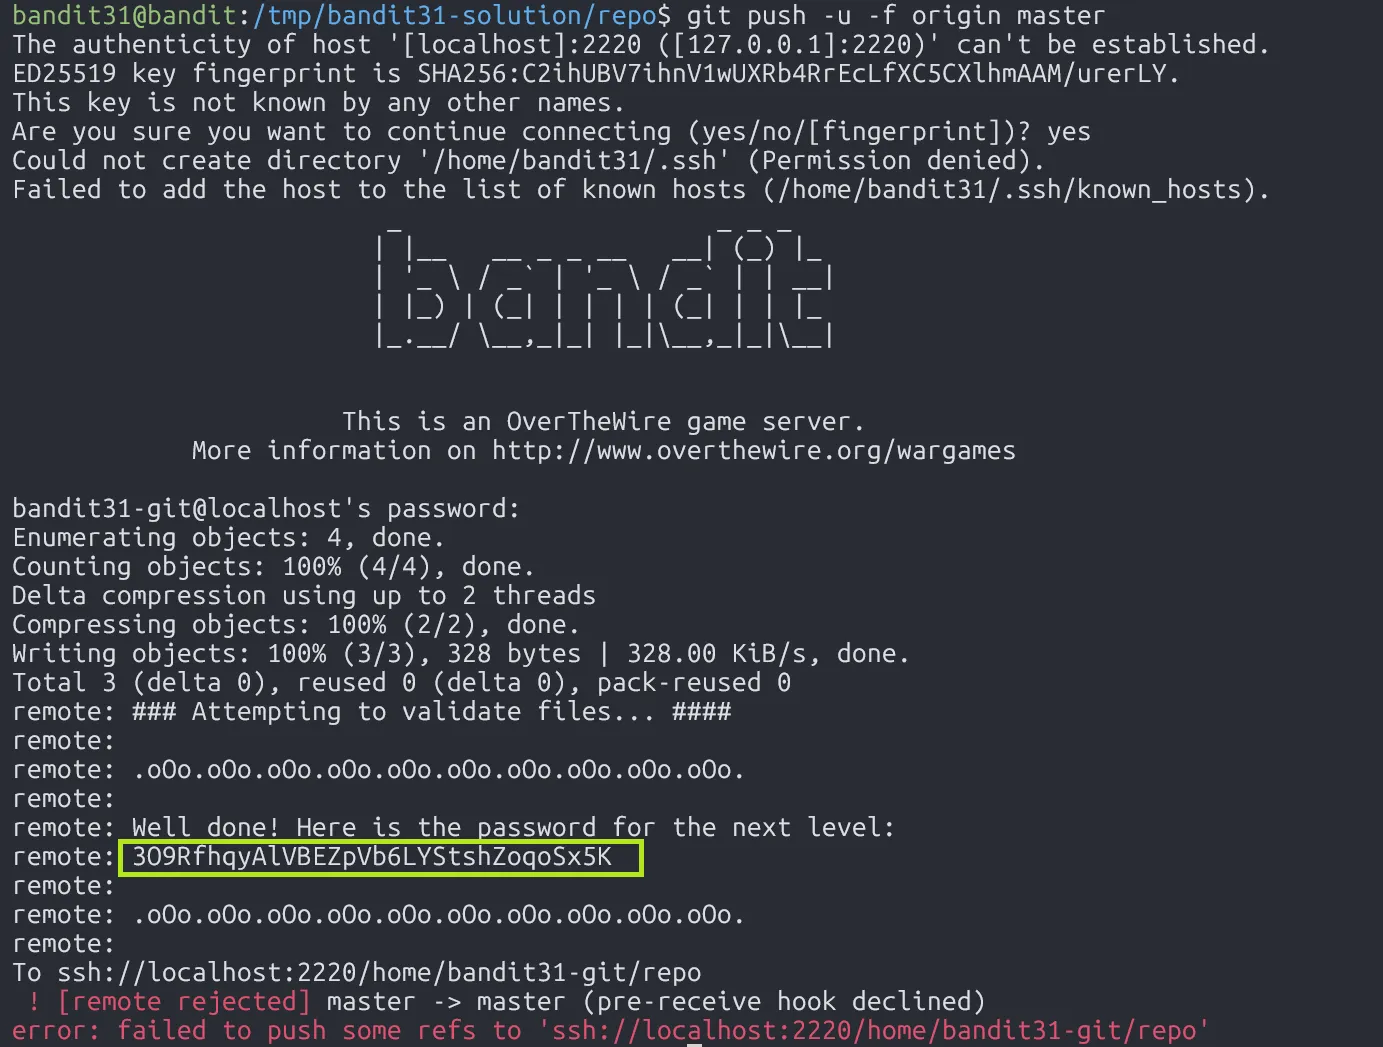
3O9RfhqyAlVBEZpVb6LYStshZoqoSx5K
Level 32 → Level 33
Level Goal
After all this git stuff, it’s time for another escape. Good luck!
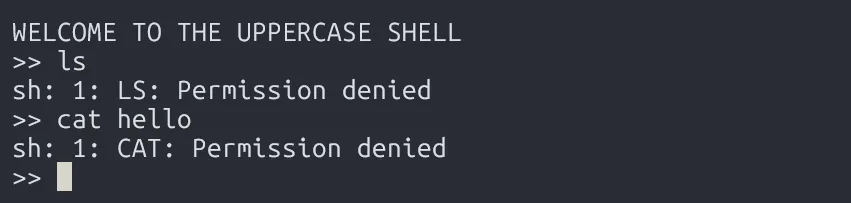
When log in to this level, we’re immediately dropped into something called the Uppercase Shell, which converts everything we type into UPPERCASE letters.
So, how to bypass this?
The trick here lies in how this custom shell is built. From the behavior, we can guess that it’s just a wrapper that takes your input, converts it to uppercase, and then passes it to the system using something like:
system(command);In UNIX-like systems, system() typically runs command using sh -c <command>. So for example, if we typed cat, the shell would actually try to run something like:
sh -c CATHowever, because CAT is in uppercase and there’s no such binary called CAT, the command fails. That’s why basic commands like sh, man, ls,… won’t work. They all get converted to uppercase.
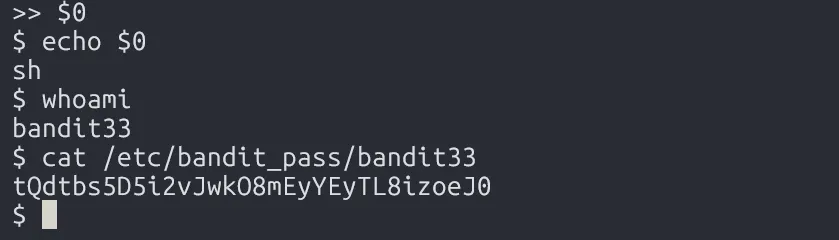
We can bypass this by using $0 to open the /bin/sh shell.
But how does $0 help?
$0 refers to the script or program being executed. So when the Uppercase Shell runs command internally via sh, we’re already inside a sh process.
The Uppercase Shell basically a
shshell, but have the feature of converting input into UPPERCASE.
Now typing $0 will not be uppercased, it stays as $0. When the shell evaluates $0, it becomes:
sh -c shWhich effectively just spawns the shell /bin/sh.
tQdtbs5D5i2vJwkO8mEyYEyTL8izoeJ0
Level 33 → Level 34

We have finished all levels in OverTheWire Bandit 🔥